Replacing a refrigerator door gasket is one of the best value repairs on the whole appliance. A tired gasket costs you cold air continuously, raises your electricity bill, and makes the fridge run constantly. The part is cheap and the job is genuinely DIY.
But a gasket fitted badly is worse than an old one, because it can leak worse than the worn part it replaced. These are the seven mistakes people make, and how to avoid each.
- Time: 30–60 minutes per door.
- Cost: $20–$45 for the gasket, model-specific.
- Tools: flathead screwdriver or trim tool, warm water, hairdryer, dollar bill.
- Verify: dollar-bill test around the full perimeter afterwards.
On this page
1. Buying by fridge brand instead of model number
Gaskets are not universal. They vary by model, by door, and sometimes by production year. The same appliance brand can have three different gasket profiles across three models in the same size class.
- Find the model number on the rating plate inside the fridge (usually on an interior wall or behind the crisper).
- Note which door — fridge door and freezer door gaskets differ.
- Search model number plus gasket, and check the product photo against your old gasket's profile.
- Check magnetic versus screw-in — some modern fridges use a push-in magnetic gasket with no screws at all.
2. Not photographing before you remove anything
The old gasket tells you how it was fitted. Once it is off, that information is gone.
- Photograph the corners — they are the fiddliest part and the ones most likely to go back wrong.
- Photograph where any screws sit, especially the ones hidden in the gasket channel.
- Note the orientation of the gasket profile as it faces the cabinet.
- Photograph the whole door with the gasket partly removed, so the channel is visible.
3. Fitting a cold, stiff gasket
A gasket that has been in a cold delivery van or a garage is stiff and will not sit in the channel properly. This is the single biggest cause of a poor fit.
Soak the new gasket in warm water for 5–10 minutes, or warm it gently with a hairdryer on low. It becomes pliable, takes the channel shape, and settles flat. Then let it reach room temperature before you begin.
4. Leaving kinks at the corners
Corners are where gaskets fail. A gasket that is pinched or twisted at a corner leaves a gap exactly where warm air enters.
- Work from the middle of each side outward toward the corners.
- Do not stretch the gasket to reach the next corner — it will pull back and leave a gap at the far end.
- Press the corner in with a trim tool rather than your fingers, to seat it fully into the channel.
- Check each corner visually from the outside before moving to the next side.
5. Forgetting the screws hidden under the gasket
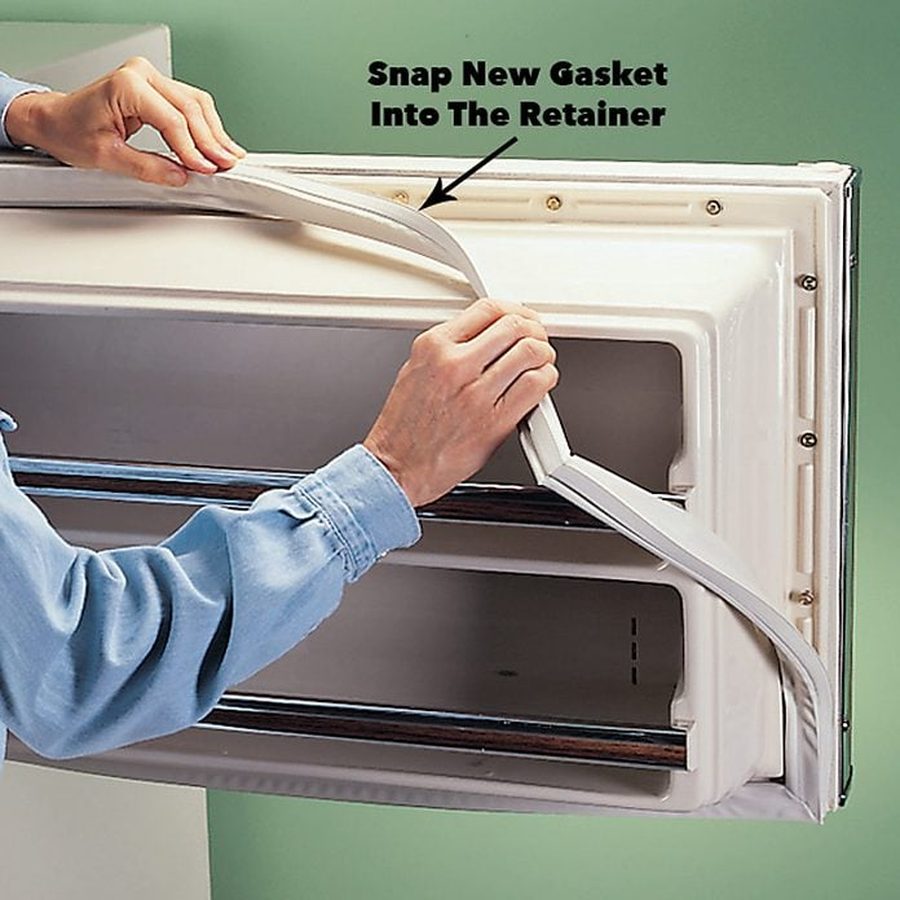
On screw-in gaskets, the retaining screws are hidden under the flap of the gasket itself. People lever at the door panel looking for them and damage the plastic.
- Peel the inner flap back and you will find the screws in the channel.
- Keep the screws in a cup — they are small and easy to lose.
- Do not overtighten on refitting. Plastic channels crack, and a cracked channel means the gasket will not stay seated.
- Some models use a retainer strip rather than individual screws — do not force it, find the release points.
6. Not checking the hinge and door level
Replacing a gasket on a door that is sagging or a fridge that is leaning will not fix the seal. The new gasket will be pressed unevenly and will fail early.
- Check the door alignment — the top and bottom gaps should be even.
- Check the hinge screws are tight, and that the hinge pins are not worn.
- Check the fridge is level front to back and side to side.
- Tilt very slightly backwards so the door swings shut on its own — this is what keeps the seal under light load when closed.
7. Not testing the seal afterwards
The job is not finished when the gasket is fitted. Verify it, and do it properly across the full perimeter.
- Dollar-bill test: close the door on a bill at twelve points around the door and pull. It should resist at every point.
- Light test: with a torch inside a darkened kitchen, look for light escaping around the door.
- Hairdryer settle: if a section is not seating, warm it gently with a hairdryer and press it into place while it cools.
- Four-hour check: run the fridge for four hours and check it holds temperature and the compressor cycles off rather than running continuously.
- Recheck after a week: gaskets settle. Confirm the seal is still tight and no corner has lifted.
| Mistake | Consequence | Prevention |
|---|---|---|
| Wrong part | Will not seat; leaks worse than before | Buy by model number and door |
| Cold gasket | Kinks, gaps at corners | Warm it in water first |
| Stretched during fitting | Pulls back, corner gaps | Work middle-outward, never stretch |
| Screws overtightened | Cracked channel, gasket pops out | Snug only, not tight |
| Sagging door not checked | Uneven pressure, early failure | Check hinge and level first |
| No verification | You never know if it worked | Dollar-bill test, then four-hour check |
Replacement door gasket — buy it by model number
Check the profile photo against your old gasket before ordering. A gasket that looks close but is a few millimetres off the profile will never seal.
Check Price on Amazon →Buy by model number and door, warm the gasket before fitting, work middle-outward so you never stretch it, snug the screws rather than tightening them, check the hinge and level first, and verify with a dollar bill at twelve points. That turns a fiddly job into a reliable one.
Frequently asked questions
Testing the seal before you commit
Before ordering a gasket, confirm the old one is actually the problem. Slide a strip of paper into the door and pull it out: if it slides out easily at several points around the frame, the seal is failing there, and a gasket is the right fix.
If the paper grips firmly everywhere but the fridge still runs warm, the gasket is not your fault and replacing it will not help. Check the door alignment and hinges first, because a sagging door can defeat a perfectly good seal.